|
The Bean Builder Tutorialby Mark Davidson |
This tutorial demonstrates the main features of building an application with the Bean Builder. The Bean Builder is a tool which allows the visual assembly of an application by instantiating and setting the properties of components based on the JavaBeansTM component architecture (beans). The dynamic behavior of the application is specified by "wiring" relationships that represent events handlers and method calls between the objects in an application. The state of this application is saved to and restored from an XML format. An application is constructed using the JavaTM API without having to write a line of source code.
 |
We will demonstrate the features of the Bean Builder by creating an application that builds a simple entry list. While trivial in functionality, this application touches upon most of the features in the Bean Builder. Entering text and pressing return field appends the text to the list. The Remove All button removes all the items from the list. When the enclosing frame is resized, the scrollable list, the text field and the button scale with the frame. |
|
All dressed up and nowhere to go!
|
Objects are retrieved from the Palette below the toolbar. The
default palette is loaded with Swing components and containers arranged alphabetically
from left to right. The Palette is specified as an external XML document and
can be edited. The default palette is named palette.xml.
The Palette
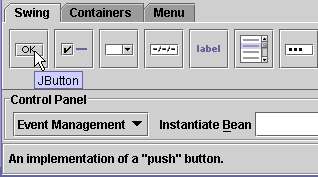
A brief description of the individual Palette items appears in the Status Bar as you move the cursor over that item. For example, as shown in the figure to the left, if you hold the cursor over the button, the tooltip displays the text of the JButton.
The icons, tooltip text, and status bar description are retrieved from the BeanInfo class associated with each object.
The Designer is where the objects are instantiated, selected and connected. This Designer represents the root container of the object graph being assembled. The Designer wraps the live application that will be constructed.
Selecting an item from the Palette will change the cursor from a pointer to a crosshair. This indicates that the tool is in "instantiation mode". You can instantiate the selected Palette item by clicking in the frame of the Designer.
An important note about setting the preferred size of components
The size of the component depend on the how the component was instantiated.
- If you single click in the Designer to instantiate, then the size of the new component is the default preferred size that is calculated based on its contents.
- Clicking and then dragging to define a rectangle, set the preferred size of the component to be the size of the rectangle.
It's very important to understand the distinction between setting the preferred size versus using the default preferred size. SpringLayout honors the preferred size of the component. The component scale correctly when its contents change if the preferred size of the component is left as its default. This is desirable for dynamic user interface elements and will easily allow the component to scale correctly when the application is localized.
 |
Nine blue and white resize handles appear around the new component. The center handle allows you to reposition the object. The handles on the edges and corners allow you to resize the component in the direction indicated by the cursor. The four dark connection handles on the outside of the object act as "anchors" or "targets" for creating dynamic event adaptors or property associations between objects. |
|
Fresh off the Palette!
|
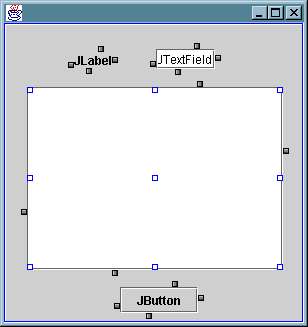 |
Clicking on an object makes it the current object. The current object has blue resizing handles around it. These handles are used to resize and move the object. The properties of the current object are displayed in the properties panel. If this is a visual object, then it is selected in the Containment Hierarchy. |
|
All the visual components
|
The instantiated objects have the default properties when the default constructor on the Class is invoked. Properties that conform to the JavaBeans specification method signatures for getters and setters are exposed and may be set to give the object a distinct identity.
For example, some visual properties on Components that can be set include the font, colors, sizing and alignment characteristics.
The Property Inspector
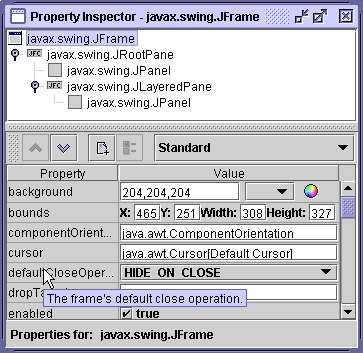
As you can see to the image to the left, a tree is displayed that represents the Containment Hierarchy starting from the root object. Underneath is a Property Sheet of introspected properties from the current object. Each row represents a PropertyDescriptor. You can use the combo box above the Property Sheet to filter the type of properties which are made visible in the table.
As you can see, if you hold the mouse over an item in the Property column, a tooltip appears with a description of the property.
You can edit properties by entering new values in the Value column and pressing Enter to accept the new value.
Up - Loads the parent of the current object into the Property Panel Down - Loads the selected property into the Property Panel. You can also double click on the selected property. Add - Places the selected object into the Design Panel for interaction. This is useful for manipulating non-visual Beans. Customizer - If enabled, this button brings up the associated customizer for the selected object.
 |
|
|
Editing the properties of the Objects
|
The model view controller (MVC) architecture of the JFC components requires a model that acts as an intermediary between the user interaction and the data. For this example we set the model of the JList object to use a DefaultListModel.
The DefaultListModel is a non-visual bean - a bean
that doesn't inherit from java.awt.Component
First we have to create a new instance of the DefaultListModel and place it on the design panel for manipulation.
The Control Panel

The modes of the builder and designer are controlled with this interface. The combo box on the left toggles the designer between two modes: The check box on the right toggles the designer on or off. If the designer is off then the designed application is "live".
- Event Management allows editing of dynamic interactions between objects.
- Layout Editing allows the editing of the resizing behavior between objects.
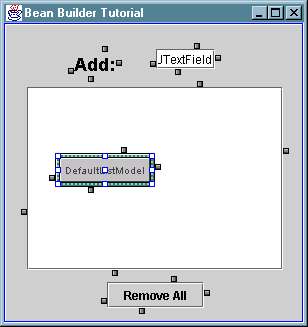 |
A visual proxy object that represents the non-visual bean appears in the upper left of the Designer and is the selected object. Notice that the containment hierarchy doesn't show the same selection. The hierarchy only displays containment relationships. This visual proxy object is used to select and hookup the non-visual Object that it wraps. You can move the visual proxy object by dragging on the center handle but you cannot resize the visual proxy. The Instantiate Bean field is used to instantiate any object from a class that is found in the classpath. |
|
Instantiating the DefaultListModel
|
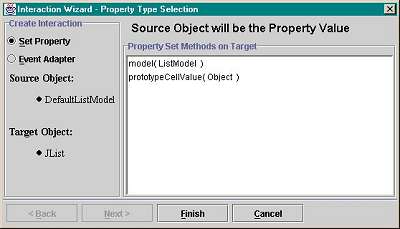
The newly instantiated DefaultListModel is in the design but is not associated with an object. This model should be associated with the JList object in the user interface. Use the Interaction Wizard to define the way that objects relate to each other. The interaction is going to take a source object and set it as a property value on the target object using a setter method from the target. This means that we want to call the JList.setModel(...) method with the list model as the argument.
 |
|
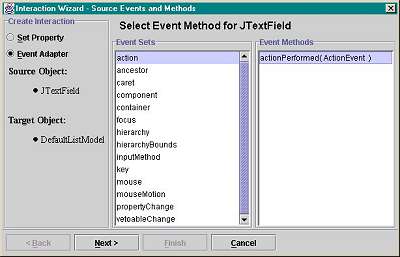
The traditional way of creating an event interaction between two objects was to create a small inner class and recompile it.
This builder uses the Dynamic Proxy API to create EventHandler objects that are event listeners. This API was added to release 1.3 and are used to synthesize listeners of arbitrary types at runtime. The advantage of using the Dynamic Proxy API is that it avoids costly inner classes and you can dynamically create these listener classes without having to recompile code.We are now going to add two EventHandlers that implement the following behavior:
 |
|
This interaction deletes all the items in the list when the "Remove All" button is pressed. Repeat the same steps using the wizard with the following values:
The event adapters and property associations are created and linked for "live" objects. You may test the live object graph by taking the Bean Builder out of Design Mode and putting it into Runtime Mode. You can switch between these two states by selecting or de-selecting the Design Mode checkbox (alt-d). This Action is mirrored on the View menu.
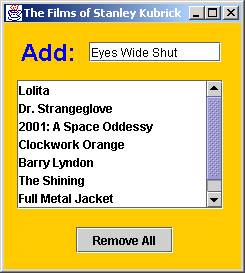
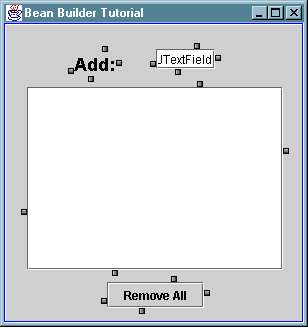
In Runtime Mode, the objects on the design panel become "live". The application behaves the exactly the way that it was designed.
Type some values in the text field and press the Enter key at the end of each string. These values appear in the list. Pressing the "Remove All" button clears the list.
The SpringLayout layout manager was introduced in release 1.4. The main benefits of using SpringLayout is that it acts like null layout for the placement of components with the condition that it honors the preferred size of the components. Furthermore, dynamic resizing behavior can be added at any time in the design process by linking the edges of components to the dependent edges of other components. For example, when the frame gets larger, it is desirable for the scrollable list to also get larger.
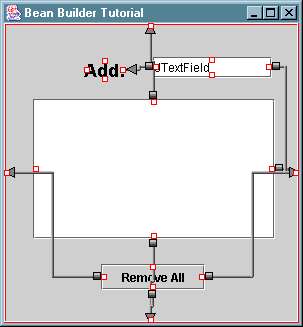
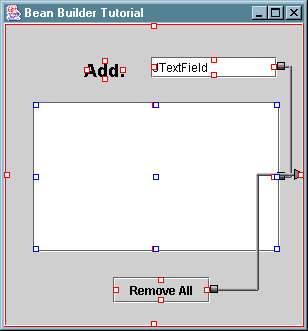
Make sure that the Designer is in Layout Editing mode by selecting Layout Editing from the Control Panel combo box. Red handles should appear on all the components where edges can be linked.
The four edges of a component are described as as points on a compass. For example, the top edge is the north side, the right edge is the east side and so on.
Using SpringLayout, relationships between the components are expressed as a "link" between the edges that span a fixed distance from the dependent component and an anchor component.
When the edge of an anchor component moves, the linked edge of the dependent component also moves to maintain the fixed distance between the edges.
There is an order dependency when linking components. If at all possible, the
east and south sides of the components should be linked first. The order dependence
is a consequence of the related properties within the SpringLayout constraints.
The properties change state as it becomes over-constrained. Please see the
javadoc for javax.swing.SpringLayout.Constraints for more details about
over-constraining.
Note: Sometimes, the blue selection handles conflict with the red edge linking handles. if this occurs, a single click on the background of the panel will make the selection handles go away.
|
The linked edges should look like the second picture to the left. |
The Bean Builder uses the Long Term Persistence for JavaBeans components for storing the state of the object graph. This persistence mechanism is a new feature in JavaTM 2 Platform, Standard Edition, release 1.4. This new persistence mechanism writes all the public state of the object graph to a plain (and editable) XML text format.
Actions
The Bean Builder wide actions are implemented in the main toolbar and the main menu. Placing the cursor over the menu or toolbar item shows its description in the status bar.
New - Creates a new Design. This command clears the existing design and sets a new root object. Open - Opens an existing design in the Long Term Persistence XML format. Save - Saves the existing design to a file. A FileChooserDialog appears to prompt for a filename if it doesn't exist.
Press the Save button to save the design to disk. Select Save As from the File menu if you want to save the state of the application using a different filename.
Note: The data currently in the models and text fields are also saved. If you wish to save the application in a blank state then delete all the values.
The saved design should look like this: tutorial.xml
One of the goals of Bean Builder is to demonstrate a new portable persistence format. You can execute the Bean Builder in "interpret mode" that takes the name of the generated archive as an argument to the builder. The file is passed to a few lines of code that reads the persistence file and recreates the application.
Note: The code required to reconstruct an XML design is trivial.try { InputStream is = new BufferedInputStream( new FileInputStream("tutorial.xml")); XMLDecoder d = new XMLDecoder(is); Object o = d.readObject(); } catch (IOException ex) { System.out.println(ex.getMessage()); }A future application may create a stub "interpreter" that would take an xml design as an argument.
From the root of the distribution, use the "-i" flag and the name of the archive as the argument:
% run -i tutorial.xml
The application appears in a new frame. The tutorial direction also has an example of a simple web browser in an archive called Web_Browser.xml
The Bean Builder is a general application builder that uses dynamic component assembly. There are a lot of little features that you can discover. The Bean Builder only uses JavaBeans component architecture mechanisms like Introspection and the BeanInfo classes to interrogate the properties of the Beans.
There are several ways that you can experiment with your own beans. You can load the beans onto the palette by invoking the Load Jar File command. You can add the beans to the classpath and edit the palette.xml file. You can also instantiate any Object in the classpath with the Instantiate Bean field.
The source code to the Bean Builder was shipped with the distribution.
Drop us a line at java-beans@java.sun.com and let us know how much fun you're having.
|
The Bean Builder, is a product of Sun MicrosystemsTM, Inc. For answers to common questions and further contact information please see the java.sun.com Help Pages. |
Copyright © 1997-2002 Sun Microsystems, Inc. All Rights Reserved. Terms of Use. Privacy Policy. |